My secondary I1 Pro has the non 'camo' carbon arms which use the rubber/white grease arm bearings.
I'm not a fan of this setup and wanted it to match my other I1 which has the self-lubricating bearings so thought I'd document the process in case anybody else wanted to try it.
It's very simple, low cost and provides a lower friction operation, which has to be a good thing. It *does* involve opening up the bracket on the motor boom however, which means breaking the seal which WILL invalidate your warranty. Mines out of warranty, so that wasn't a consideration but bear this in mind if you decide to do it.
You will need to buy a set of 2415 self-lubricating bearings. Mine came from China fir the grand price of £10 delivered and I have a load left over:

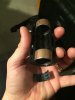
You will need two per arm and they will need opening up by about 3/4 inch for fitting- the hardest part of the process. I put them through a screwdriver to protect the PTFE liner on the bearing, stand on either end of the screwdriver and pull the bearing open using finger-power:


Next it's a case of taking the 8 screws out of the motor arm bracket and removing the greased rubber liners at each end and both halves of the bracket:


Slip your expanded bearings over the arm and with the opening faving you, gently squeeze the beating shut with a pair of mole-grips:

Once they're shut, place the bearings back into the bracket, this time ensure the opening of the bearing is near to the top or bottom of the bracket-half. This will allow any remaining closure that's needed, to occur when the bracket is put back together.

A thin piece of packing is needed to eliminate any play or vibration - the DJI bearings use a thin piece of rubber about 1mm thick. Rather than buy some, I simply reused the existing rubber pieces which I'd removed and sliced off the ridges in them to get the thickness I needed.
Then it's just a case of screwing the bracket back together- I tighten the screws up gradually and alternately in a pattern, as if I was bolting down a cylinder head - this keeps the pressure even and so reduces any strain.
Disconnect the control arm from the bracket and try rotating the arm in the bracket to make sure it rotates smoothly and easily. Back off all 8 screws ever so slightly if the rotation feels tight. I've never needed to do this. There should be no slop and no tightness

If all is well, reattach the control arm and you're done!
I'm not a fan of this setup and wanted it to match my other I1 which has the self-lubricating bearings so thought I'd document the process in case anybody else wanted to try it.
It's very simple, low cost and provides a lower friction operation, which has to be a good thing. It *does* involve opening up the bracket on the motor boom however, which means breaking the seal which WILL invalidate your warranty. Mines out of warranty, so that wasn't a consideration but bear this in mind if you decide to do it.
You will need to buy a set of 2415 self-lubricating bearings. Mine came from China fir the grand price of £10 delivered and I have a load left over:
You will need two per arm and they will need opening up by about 3/4 inch for fitting- the hardest part of the process. I put them through a screwdriver to protect the PTFE liner on the bearing, stand on either end of the screwdriver and pull the bearing open using finger-power:
Next it's a case of taking the 8 screws out of the motor arm bracket and removing the greased rubber liners at each end and both halves of the bracket:
Slip your expanded bearings over the arm and with the opening faving you, gently squeeze the beating shut with a pair of mole-grips:
Once they're shut, place the bearings back into the bracket, this time ensure the opening of the bearing is near to the top or bottom of the bracket-half. This will allow any remaining closure that's needed, to occur when the bracket is put back together.
A thin piece of packing is needed to eliminate any play or vibration - the DJI bearings use a thin piece of rubber about 1mm thick. Rather than buy some, I simply reused the existing rubber pieces which I'd removed and sliced off the ridges in them to get the thickness I needed.
Then it's just a case of screwing the bracket back together- I tighten the screws up gradually and alternately in a pattern, as if I was bolting down a cylinder head - this keeps the pressure even and so reduces any strain.
Disconnect the control arm from the bracket and try rotating the arm in the bracket to make sure it rotates smoothly and easily. Back off all 8 screws ever so slightly if the rotation feels tight. I've never needed to do this. There should be no slop and no tightness
If all is well, reattach the control arm and you're done!