- Joined
- Dec 27, 2019
- Messages
- 27
- Reaction score
- 9
- Age
- 60
DJI Inspire 1 Pro Cracked Carbon Fiber Leg Repair
I own an Inspire 1 Pro and noticed movement in the Right leg (horizontal member with motors attached) behind the joint with the arm that comes down from the body. It was clear that it was cracked just inside the joint so none of the wrapping methods I had seen would work and I would need to cut the leg and use a tube inside the leg.
I had read in a number of places that the inside diameter of the leg was 19.5mm and of the epoxy types I had read about, the J-B Weld was available locally. Though I have an angle grinder I had visions of carbon fiber pieces flying everywhere so I stuck with doing everything by hand.
I picked up:
20mm O.D. carbon fiber tube from eBay
J-B Weld Plastic Bonder High Strength Paste Automotive Adhesive from ACE Hardware
And used:
A metal cutting reciprocating saw blade
A 24” metal ruler
Woodworking protractor, ruler thingy
Clamps
Harbor Freight electronic micrometer
I have the InsPak landing mode case so the AC was in landing mode throughout.
I started by removing the strut clamp (I don’t really know what everything should be called so I’ma make up names for all these parts) and cutting the leg flush with the grooved metal piece at the joint.

The fine metal blade probably would have been cleaner.
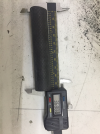
I then measured the Inside Diameter of the leg. And the Outside Diameter of the tube I had purchased.

Cut the tube to about 3¾”
Sanded it down some. My intention was to keep the O.D. of the tube larger than the I.D. of the leg, cut the tube lengthwise and squeeze it into the leg so it would be snug.
Cut the slot in the tube.

I cut the slot then sanded all of the edges smooth because the wiring will need to slip through this slot as you insert the piece into the leg.
TIP: Mark the middle of the length of tube because once the tube is inside the leg you’ll have no idea if it is centered between the two leg sections if it’s not marked.
At this point, the 8 screws have been removed and the cover taken off the joint and the leg section is free to move around a bit.

Slathering the tube with J-B Weld
When you insert the tube into the center section of the tube it will only go so far before running into the wiring that turns to go up to the body. On the motor end, however, the tube could slide all the way into the leg leaving nothing to insert into the center so be aware and be sure the center mark on the tube is where the two leg sections meet.

At this point I realized that there are two separate alignments that need to happen. The feet need to be aligned to each other as well as being aligned in relation to the body of the AC.
I clamped a metal ruler (because it’s what I could reach) to the feet and let the glue dry overnight.

The next day I reattached the joint cover and used the protractor thingy to measure the angle of the legs on the other side and, moved the repaired leg to match that angle (~95°).

Reattaching the strut clamp


And added some Loctite to the arm cover/clamp. It seems as though the strut clamp is the primary means of keeping the leg from rotating, I don’t thing the cover at the joint, even with 8 screws would do the job.
Lessons learned:
Thanks to everyone here who has posted previously on this and other repairs, I wouldn’t have tried this without this group as a resource.
I own an Inspire 1 Pro and noticed movement in the Right leg (horizontal member with motors attached) behind the joint with the arm that comes down from the body. It was clear that it was cracked just inside the joint so none of the wrapping methods I had seen would work and I would need to cut the leg and use a tube inside the leg.
I had read in a number of places that the inside diameter of the leg was 19.5mm and of the epoxy types I had read about, the J-B Weld was available locally. Though I have an angle grinder I had visions of carbon fiber pieces flying everywhere so I stuck with doing everything by hand.
I picked up:
20mm O.D. carbon fiber tube from eBay
J-B Weld Plastic Bonder High Strength Paste Automotive Adhesive from ACE Hardware
And used:
A metal cutting reciprocating saw blade
A 24” metal ruler
Woodworking protractor, ruler thingy
Clamps
Harbor Freight electronic micrometer
I have the InsPak landing mode case so the AC was in landing mode throughout.
I started by removing the strut clamp (I don’t really know what everything should be called so I’ma make up names for all these parts) and cutting the leg flush with the grooved metal piece at the joint.
The fine metal blade probably would have been cleaner.
I then measured the Inside Diameter of the leg. And the Outside Diameter of the tube I had purchased.
Cut the tube to about 3¾”
Sanded it down some. My intention was to keep the O.D. of the tube larger than the I.D. of the leg, cut the tube lengthwise and squeeze it into the leg so it would be snug.
Cut the slot in the tube.
I cut the slot then sanded all of the edges smooth because the wiring will need to slip through this slot as you insert the piece into the leg.
TIP: Mark the middle of the length of tube because once the tube is inside the leg you’ll have no idea if it is centered between the two leg sections if it’s not marked.
At this point, the 8 screws have been removed and the cover taken off the joint and the leg section is free to move around a bit.
Slathering the tube with J-B Weld
When you insert the tube into the center section of the tube it will only go so far before running into the wiring that turns to go up to the body. On the motor end, however, the tube could slide all the way into the leg leaving nothing to insert into the center so be aware and be sure the center mark on the tube is where the two leg sections meet.
At this point I realized that there are two separate alignments that need to happen. The feet need to be aligned to each other as well as being aligned in relation to the body of the AC.
I clamped a metal ruler (because it’s what I could reach) to the feet and let the glue dry overnight.
The next day I reattached the joint cover and used the protractor thingy to measure the angle of the legs on the other side and, moved the repaired leg to match that angle (~95°).
Reattaching the strut clamp
And added some Loctite to the arm cover/clamp. It seems as though the strut clamp is the primary means of keeping the leg from rotating, I don’t thing the cover at the joint, even with 8 screws would do the job.
Lessons learned:
- Some type of fixture that would hold all four feet at the correct angle that is all ready to go once the epoxy is applied would be a good idea.
- Mark the strut clamp and the piece it slips over for reassembly.
- Damp paper towels are good for carbon fiber dust.
- A respiratory is prolyl a good idea if you grind or sand with power tools.
Thanks to everyone here who has posted previously on this and other repairs, I wouldn’t have tried this without this group as a resource.