- Joined
- Mar 18, 2015
- Messages
- 51
- Reaction score
- 21
- Age
- 49

 Hey Guys I posted this on the other forum also just thought it may be helpful
I wanted to type something up with my experience with utilizing two different types of paint on the body sections of the inspire one so that if someone is looking to do do the same it might help them chose which type to use. Also I would like to upload pictures but it keeps giving me an error code but that's another issue lol.
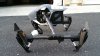
1. I did a complete removal of the canopy, nose and arms. I left the bottom in white also the battery white to help with orientation and it does look pretty nice.
2. I painted one body using black Plasti Dip, I bought mine at Home Depot. The first coat I sprayed far away and covered about 50% and let dry to give me a proper base (I used GOO Gone to prep the plastic and let dry). Let dry for 30 minutes before adding the other 3 to 4 coats (Be patient it will build up on you and may run). After the painting is done let dry for 4-5 hours and the end product will be flawless (Until you put it back together).
Tricks I learned from two pull off and repaints when using Plasti Dip. The finish is naturally sticky so when when screwing the screws back in they will grab the paint and it will peel on you and really piss you off. After the second time trying to accomplish this a light went on in my head and I rubbed a very very small amount of cooking oil on the sides and bottom of the head on the screws, problem solved.
Another issue if you are using plasti dip. If you paint the nose piece be very careful to tread lightly where the four screws land on the nose piece, you will add material and the built in spacers on the screws will be just a little back behind the plastic and if you over tighten them I can see them producing a hair line fracture in the nose piece.
Overall after trial and error the paint looks great and holds up well, however the texture is grippy and will grab dust, feathers or whatever is flying around up there. (Not wet sticky, just you get what I mean) I dont want people asking if im flying my bird with wet paint on it lol..
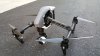
On the second body I utilized RUST-OLEUM FLEXIDIP Gun Metal Gray...
I did not have to do a body tear down due to buying these pieces as a second body.
I used the same method as above for prepping and painting. However this paint dries much much quicker, if you are in the sun 30 seconds lol. For the first couple of coats (This is for both types) I spot sprayed and did not use full on finger down to the can method this may cause build up or runs.
The finish is really nice, not as sticky or as thick/heavy feeling as the plasti dip. When putting it on the drone I found it easier to screw back in without each piece or screw grabbing on the paint (I still used a tiny bit of cooking oil to be safe but i dont think you would even need it to be honest). The complete dry time is maybe 30 min with 4 coats, in the sun like i did it each coat was done in 30 seconds.
My pick
I will be repainting the black body utilizing the RUST-OLEUM Flexidip, it may be a matter of opinion but if you have both to compare you will know what im talking about. Trust me I will be using Plasti Dip on a bunch of stuff I have because its a great product with many uses but for the bird I think you will be better using the Flexi Dip.
Attachments
Last edited: