Do not use to much force on the screws, if you can't get them just heat the end of the tool with a cigarette lighter for a few seconds and then insert it in the crew. Let is just sit for a few seconds and then try removing, should work. Just be careful of not heating to much.so 5 out of the 8 screws we're able to come out. I stripped the other. What's the best way to remove the screws now??? Any help would be greatly appreciated.

You are using an out of date browser. It may not display this or other websites correctly.
You should upgrade or use an alternative browser.
You should upgrade or use an alternative browser.
Anyone tried these folding props?
- Thread starter BrenC11
- Start date
I had one that stripped and I got it out by hitting a small flat head screw driver into the screw with a small rubber mallet until the screw driver cut deep enough into the said screw so I could back it out. Destroys the screw but they're utter trash anyways. If you try this BE EXTREMELY CAREFUL with your hits. A couple of light taps is all I needed to cut deep enough into the screw head, they're extremely fragile and soft. Support the motor that your working on with your other hand so that the hammer hits don't radiate through the aircraft. Hopefully this process makes sense and helps you out. I did this about a month ago when I first swapped out the stock propellers for t-motor props and LP mounts. Been flying almost everyday since then and flies better then ever and love the current setup I have. Just want to swap to the foldable props to help speed up the setup process while staying away from DJI's plastic trash.

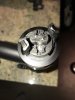
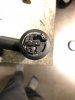
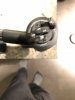
Quick question for the technical literate. As I mentioned, I have a bolt stuck in the original DJI quick release mount. I was wondering if I were to sort of Dremel the mount away and expose the bolt, and then use as serious pair of vice grips to manually turn the screw, would this make sense or does anyone see some unforeseen problem that I may encounter? I can still fly with the current DJI original setup but my carbon fiber props are back in the container waiting for some love. Also, I am patient for the most part and can wait for Florida Drone Supply to save the day. Just spit-balling some ideas at the more savvy members of the group. Thanks in advance.
Just make sure you separate the motor from the drone. Makes it much easier to work with. See the inspire 2 tear down to see how to remove the motor.
- Joined
- Dec 28, 2016
- Messages
- 210
- Reaction score
- 75
That is exactly what I did on one stubborn screw. Just be very careful with the Dremmel when cutting the plastic prop holder yoiu don't damage the motor.
That is exactly what I did on one stubborn screw. Just be very careful with the Dremmel when cutting the plastic prop holder yoiu don't damage the motor.
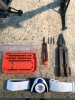
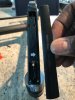
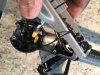
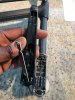
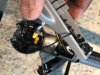
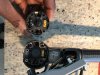
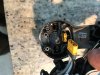
Just to be clear, is there enough room once the plastic is cut away to grab the screw head with some pliers, or a vice grip and then twist it out? As I can get one screw out, I was thinking to remove that one screw on the other side of the stuck. Once this is loose and I cut around the other part would there be enough to grasp. ****, I hope I am explaining this well enough. Please check the photos out. Hopefully you will have an idea of what I mean.
Attachments
- Joined
- Dec 28, 2016
- Messages
- 210
- Reaction score
- 75
Yes, definitely. Once the other screw is removed with the Torx driver, then cut all the plastic prop retained away and you will have plenty of screw protruding from the top of the motor to grasp it with a small vice grips and slowly work the screw back and forth until the locktite is loose and the screw will turn out. You could even apply a little heat to the screw head to help break the locktite lose. Just be careful you don't break the screw in half while trying to get it loose. Also, when using the Dremmel tool to cut the plastic prop locking device away be careful you don't cut into the motor shaft that is protruding.
Update. It seems that good karma and clean living has paid off. One of the guys over at Advexure saw my situation and they stepped in to offer me a CCW motor for my I2 that will arrive tomorrow. The guys from Florida Drone Supply also offered help which is appreciated. This is one great group and my hat goes off to all that offered suggestions and assistance. Now all I need to do is take the old motor out. ")
Pictures of the whole operation please !Update. It seems that good karma and clean living has paid off. One of the guys over at Advexure saw my situation and they stepped in to offer me a CCW motor for my I2 that will arrive tomorrow. The guys from Florida Drone Supply also offered help which is appreciated. This is one great group and my hat goes off to all that offered suggestions and assistance. Now all I need to do is take the old motor out.
Pictures of the whole operation please !
Hey Chopcat, do you mean the disassemble process? There are some YouTube videos that I am going to follow. I can find you the link.
Just interested in what you find as you go through the process. I am sure you will share any tips along the way...TC
Just interested in what you find as you go through the process. I am sure you will share any tips along the way...TC
For sure. I will share. I will try to document and post here. From what I understand, it is a fairly easy process. I found a link but can not get it to play. Maybe you can if I post it here.
Well had my first full day with the new props. So far they are awesome! Only negative thing I can see about them is that when you first engage the motors the aircraft does shake for about a second until the blades spin up fast enough to balance out the props. Even setting them up to the deployed position before engine start up still results in this. But to be honest really no big deal. Did a quick shoot of a local Taco Hell I mean bell and ran 2 sets of batts before hand to test out the props. Aircraft flies great and responds as it should with carbon fiber props. Also was able to modify my landing mode GPC case to make it fit. It's not pretty but she's in there and is secure! Love these props!


Well had my first full day with the new props. So far they are awesome! Only negative thing I can see about them is that when you first engage the motors the aircraft does shake for about a second until the blades spin up fast enough to balance out the props. Even setting them up to the deployed position before engine start up still results in this. But to be honest really no big deal. Did a quick shoot of a local Taco Hell I mean bell and ran 2 sets of batts before hand to test out the props. Aircraft flies great and responds as it should with carbon fiber props. Also was able to modify my landing mode GPC case to make it fit. It's not pretty but she's in there and secure! Love these props!
I received mine also but had a few jobs and didn't want to fly on the unproven (to me) props yet. What did you use to trim the foam? I am thinking of using a brand new fillet knife.
I received mine also but had a few jobs and didn't want to fly on the unproven (to me) props yet. What did you use to trim the foam? I am thinking of using a brand new fillet knife.
I used a long razor blade knife and a drywall saw. If you want to do it right though I heard using an electric meat cutting knife will give great results. Leaves one heck of a mess and is a total PITA but totally worth it if you want to keep your aircraft in a hard case.
Last edited:
I used a long razor blade knife and a drywall saw. If you want to do it right though I heard using an electric meat cutting knife will give great results. Leaves one heck of a mess and is a total PITA but totally worth it if you want to keep your aircraft in a hard case.
I think Dr. John modified the original case. I ordered a Peli and will eventually use that once it arrives but for the time being the original DJI case seems to do the trick. I want to also get that new LowePro Drone Guard Inspired once it comes out.
I have the german flight mode case and they suggested using a ceramic knife for cutting the foam but the idea of the elecreic carving knife appealsI used a long razor blade knife and a drywall saw. If you want to do it right though I heard using an electric meat cutting knife will give great results. Leaves one heck of a mess and is a total PITA but totally worth it if you want to keep your aircraft in a hard case.

For anyone having difficulties getting stripped screws out of their motors, I suggest using a micro set of easy-outs.
Alden 4507P Micro Grabit Broken Bolt Extractor 4 Piece Kit - Threading Tap Extractors - Amazon.com
My first Inspire 2 didn't cause me any issues getting those screws out of the motors. Well, that Inspire 2 needed warranty work and I got a different one back. I ran into much more difficulty removing the screws the second time around. 2 became stripped and 1 broke my nice torx driver (or, it was nice before it was broken). I bought this specific easy out set and had a 3 messed up screws out of the motors within 5 minutes. All you need is a variable speed drill. The easy out bits have a drilling bit on one side and the easy out bit on the other side. You don't have to drill a deep hole. 1-2mm seemed to be deep enough for me to get the "grip" side of the bit to dig in and extract the screw. I like this method because you don't have to cut off the mounting plates, you don't mar up the motors, and you don't have to put a heat gun or soldering iron on your motors.
Here is the promise installation photos...
Attachments
-
 IMG_1944.JPG60.5 KB · Views: 95
 -
 IMG_1947.JPG97.2 KB · Views: 90
 -
 IMG_1948.JPG56.8 KB · Views: 90
 -
 IMG_1950.JPG69.8 KB · Views: 91
 -
 IMG_1949.JPG76 KB · Views: 87
 -
 IMG_1951.JPG69.6 KB · Views: 89
 -
 IMG_1952.JPG77.6 KB · Views: 89
 -
 IMG_1953.JPG80.9 KB · Views: 89
 -
 IMG_1954.JPG63.4 KB · Views: 87
 -
 IMG_1955.JPG73.1 KB · Views: 84
Similar threads
- Replies
- 1
- Views
- 2K
- Replies
- 6
- Views
- 4K
- Replies
- 0
- Views
- 3K
- Replies
- 0
- Views
- 2K
- Replies
- 8
- Views
- 5K

