So I recently joined the ranks of those who've crashed their Inspires  ....Totally my fault, no visible damage to the aircraft but the camera and gimbal were wrecked...After spending a day basking in my personal sorrow I decided to turn this into a positive, not just for me but for any of you who could benefit.
I took apart my Inspire camera") ...Yep, stripped that ***** down to the lens housing. Sorry about some of the pictures being blurry, time to retire my Nikon. And if there's anything more specific you'd like to see post up with any questions, I can rip it all apart again and show more specifics
...Yep, stripped that ***** down to the lens housing. Sorry about some of the pictures being blurry, time to retire my Nikon. And if there's anything more specific you'd like to see post up with any questions, I can rip it all apart again and show more specifics
(Disclaimer: This isn't as complicated as some people have told me it was but it's also not for the non-technically inclined. I can not stress enough to not lose any parts or rip any of the ribbon cables, these parts are NOT sold individually and you'll end up needing a replacement unit or sending in for repair. I hold no responsibility for what you do to your camera. Don't blame me, just passing along pics n stuff)
And so they said.....Press forward
You'll need a few things to get started. Some kind of picking tool (I've had this little right-angle "dental" pick) a small jewlers style phillips head screwdriver and finally a 1.5mm hex driver.

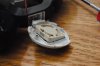
The first thing you need to do is get this plastic guard thing off, I just used a small blade and unclipped the 2 parts, they will just fall off, the bottom one might stick you can pull it off and set them to the side


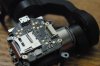
The next step is to remove the four (4) hex screws on the bottom shell piece. Set them to the side.


So with the screws out, you can remove the top shell, there is a heat sink with shield and heat tape, this piece can be removed with 4 phillips screws (time for the jewlers phillips head) You'll end up with the outer shell which can be used to hydro dip your camera to match your Inspire (or maybe matrice100)


....Totally my fault, no visible damage to the aircraft but the camera and gimbal were wrecked...After spending a day basking in my personal sorrow I decided to turn this into a positive, not just for me but for any of you who could benefit.I took apart my Inspire camera
...Yep, stripped that ***** down to the lens housing. Sorry about some of the pictures being blurry, time to retire my Nikon. And if there's anything more specific you'd like to see post up with any questions, I can rip it all apart again and show more specifics(Disclaimer: This isn't as complicated as some people have told me it was but it's also not for the non-technically inclined. I can not stress enough to not lose any parts or rip any of the ribbon cables, these parts are NOT sold individually and you'll end up needing a replacement unit or sending in for repair. I hold no responsibility for what you do to your camera. Don't blame me, just passing along pics n stuff)
And so they said.....Press forward
You'll need a few things to get started. Some kind of picking tool (I've had this little right-angle "dental" pick) a small jewlers style phillips head screwdriver and finally a 1.5mm hex driver.
The first thing you need to do is get this plastic guard thing off, I just used a small blade and unclipped the 2 parts, they will just fall off, the bottom one might stick you can pull it off and set them to the side
The next step is to remove the four (4) hex screws on the bottom shell piece. Set them to the side.
So with the screws out, you can remove the top shell, there is a heat sink with shield and heat tape, this piece can be removed with 4 phillips screws (time for the jewlers phillips head) You'll end up with the outer shell which can be used to hydro dip your camera to match your Inspire (or maybe matrice100)