Did got the app yesterday played around for a sec but always got the message start to far for batt do i have to install map etc
Thanks
Mariano
Thanks
Mariano

When you draw a mission, at the end. double click on the map were you plan to start (home point) for a virtual startpoint ( indigo colored point) will appear.Did got the app yesterday played around for a sec but always got the message start to far for batt do i have to install map etc
Thanks
Mariano
ThanksWhen you draw a mission, at the end. double click on the map were you plan to start (home point) for a virtual startpoint ( indigo colored point) will appear.
Good evening Fei8820, I just posted a workflow for the Drones/Maps Made Easy earlier, check it out and see if it gets you started.i am looking for apps some is easy for mapping project... something like
Pix4Dmapper Capture App
this only apply on phantom 2 v+ but not available for i1
any other solutions ?
anyhelp in this would be highly appriciated
i am looking for apps some is easy for mapping project... something like
Pix4Dmapper Capture App
this only apply on phantom 2 v+ but not available for i1
any other solutions ?
anyhelp in this would be highly appriciated
Your workflow does not take in the necessary early flight checks required by most certified pilots ops manual. I must get my aircraft in the air and do all the checks before closing GO and going over to MME.Greetings,
I have been using Pix4d and Drones Made Easy. Both have their benefits for aerial mapping. With Pix4D you can set overlap, altitude and collection speed, which is all good, but if you need a larger area that requires 2 or 3 batteries, Pix4D does not have those features built in. But Drones Made Easy (DME) and their processing app Maps Made Easy. does. The tricky part with DME is the transition from DJI Go to DME.
So here is the integrated procedure I have pieced together to get my Inspire connected to Drones Made Easy app. I am running an iPad Air 2 with the following versions: DME app - 1.3.2, build 011416, DJI Go app - 2.4.3, Inspire - 1.6.0.40, Controller - 1.5.70 and Camera - 1.5.0.30 from the 22 December 2015 DJI downloads website.
Please feel free to comment on any steps that would improve clarity, safety or communication.
1. Power Inspire, controller and connect iPad to controller via USB cable.
2. Open the Dji Go app and verify you are connected.
3. Go to Aircraft Status and EXIT TRAVEL MODE.
4. Power off Inspire and connect camera, Power up Inspire again. I personally do not like making an electrical connection to an active computer circuit.
5. Return to DJI GO and Open Camera Menu/Settings, scroll to the bottom and FORMAT SD.
7. In SETTINGS, open camera/PHOTO and select SINGLE SHOT, IMAGE SIZE - 16:9 and finally IMAGE FORMAT - JPG and RAW. I have no idea if DME can capture or set any of these values AFTER DJI GO is closed it is closed, so set them now.
8. Next take a single photo at ground level, i.e. wherever you plan to take off. You will need a single image when you get to processing to establish ground altitude.
9. Go to DJI Library/Photos and check to confirm you have an image there.
10. For multiple battery flights the next step is important. Go to RC Settings (Controller icon next to the WiFi icon) and open AIRCRAFT BATTERY and set LOW BATTERY to 20%. I have had 30% alarm before you reach the programmed end of first battery. Right now, I do not know if DME will mark the point and return to HOME for the 2nd battery installation or ABORT the mission. Why take the chance.
11. Speaking of HOME, make sure to allow enough time for the HOME point to set in DJI BEFORE you close the app. Again, I do not know how DME sets the HOME point or transfers it from DJI.
12, Now you are ready to transfer all this info to DME. On the controller set the PAF switch (upper left) to “F”. You should see SAFE TO FLY GPS go yellow (non-GPS) and back to green.
13. Close DJI Go and make sure it is not running in the background.
14. Open MME and CREATE NEW MISSION.
15. Verify you are CONNECTED, if not close MME and reopen and make sure PAF switch (upper left) to “F”. When you get connected you can define the area with orange bounding circles for your flight. Inside the map box you should see white lines arranged in parallel paths defining the path your drone will fly. Adjust as necessary.
16. With your map box defined and your parallel flight path inside, you should now be able to open the Aircraft icon in the upper right corner and UPLOAD your flight plan.
- Press start and MME should start the engines, go to altitude and start the mission. Note all manual camera functions on the controller are disabled. You cannot take an image manually to set the ground altitude, which you will need for processing in the MME software.
- Once in the air and on your first leg of the mission you should be fairly close to HOME POINT, so now is the time to check it out, particularly if you are running a 2 or 3 battery collect. The documentation is not clear here, should you use the HOME button on the controller or the MME app? I always use the controller since I know it is still connected to the aircraft. Again no clear guidance if you use the controller HOME button, is that point marked in the MME software as the returning point for the second battery? I have not tested this out yet.
You can also do the flight plan in the comfort of the office and save it, then just load it when in the field. The flight plan will not engage until you are over 5m above takeoff point.Greetings,
I have been using Pix4d and Drones Made Easy. Both have their benefits for aerial mapping. With Pix4D you can set overlap, altitude and collection speed, which is all good, but if you need a larger area that requires 2 or 3 batteries, Pix4D does not have those features built in. But Drones Made Easy (DME) and their processing app Maps Made Easy. does. The tricky part with DME is the transition from DJI Go to DME.
So here is the integrated procedure I have pieced together to get my Inspire connected to Drones Made Easy app. I am running an iPad Air 2 with the following versions: DME app - 1.3.2, build 011416, DJI Go app - 2.4.3, Inspire - 1.6.0.40, Controller - 1.5.70 and Camera - 1.5.0.30 from the 22 December 2015 DJI downloads website.
Please feel free to comment on any steps that would improve clarity, safety or communication.
1. Power Inspire, controller and connect iPad to controller via USB cable.
2. Open the Dji Go app and verify you are connected.
3. Go to Aircraft Status and EXIT TRAVEL MODE.
4. Power off Inspire and connect camera, Power up Inspire again. I personally do not like making an electrical connection to an active computer circuit.
5. Return to DJI GO and Open Camera Menu/Settings, scroll to the bottom and FORMAT SD.
7. In SETTINGS, open camera/PHOTO and select SINGLE SHOT, IMAGE SIZE - 16:9 and finally IMAGE FORMAT - JPG and RAW. I have no idea if DME can capture or set any of these values AFTER DJI GO is closed it is closed, so set them now.
8. Next take a single photo at ground level, i.e. wherever you plan to take off. You will need a single image when you get to processing to establish ground altitude.
9. Go to DJI Library/Photos and check to confirm you have an image there.
10. For multiple battery flights the next step is important. Go to RC Settings (Controller icon next to the WiFi icon) and open AIRCRAFT BATTERY and set LOW BATTERY to 20%. I have had 30% alarm before you reach the programmed end of first battery. Right now, I do not know if DME will mark the point and return to HOME for the 2nd battery installation or ABORT the mission. Why take the chance.
11. Speaking of HOME, make sure to allow enough time for the HOME point to set in DJI BEFORE you close the app. Again, I do not know how DME sets the HOME point or transfers it from DJI.
12, Now you are ready to transfer all this info to DME. On the controller set the PAF switch (upper left) to “F”. You should see SAFE TO FLY GPS go yellow (non-GPS) and back to green.
13. Close DJI Go and make sure it is not running in the background.
14. Open MME and CREATE NEW MISSION.
15. Verify you are CONNECTED, if not close MME and reopen and make sure PAF switch (upper left) to “F”. When you get connected you can define the area with orange bounding circles for your flight. Inside the map box you should see white lines arranged in parallel paths defining the path your drone will fly. Adjust as necessary.
16. With your map box defined and your parallel flight path inside, you should now be able to open the Aircraft icon in the upper right corner and UPLOAD your flight plan.
- Press start and MME should start the engines, go to altitude and start the mission. Note all manual camera functions on the controller are disabled. You cannot take an image manually to set the ground altitude, which you will need for processing in the MME software.
- Once in the air and on your first leg of the mission you should be fairly close to HOME POINT, so now is the time to check it out, particularly if you are running a 2 or 3 battery collect. The documentation is not clear here, should you use the HOME button on the controller or the MME app? I always use the controller since I know it is still connected to the aircraft. Again no clear guidance if you use the controller HOME button, is that point marked in the MME software as the returning point for the second battery? I have not tested this out yet.
You are absolutely right! Doing all the DJI pre-flight checks is mandatory. My goal was to show the integrated transition procedure from DJI to MME.Your workflow does not take in the necessary early flight checks required by most certified pilots ops manual. I must get my aircraft in the air and do all the checks before closing GO and going over to MME.
Tell me more about doing the flight plan at the office, this sounds like a great tool. How exactly does the flight plan respond when you are NOT over the take off point? Do you run 2 -3 battery flights?You can also do the flight plan in the comfort of the office and save it, then just load it when in the field. The flight plan will not engage until you are over 5m above takeoff point.
In the offline planning you just choose where you want the takeoff point to be approx. It will readjust to the actual takeoff/homepoint point when you load it live. Is that what you meant?Tell me more about doing the flight plan at the office, this sounds like a great tool. How exactly does the flight plan respond when you are NOT over the take off point? Do you run 2 -3 battery flights?
In the offline planning you just choose where you want the takeoff point to be approx. It will readjust to the actual takeoff/homepoint point when you load it live. Is that what you meant?
I have never had a job yet that needs multiple battery flights. I have heard of folk using it successfully though.
At first I couldn't get the mission to engage but I just didn't have it high enough. I now take it up well over 5m before engaging.
As i can see your GoP app is still on 2.4.3 , i'm on 2.5 now, probably that's why my switch GoP--MmE doesn't workGreetings,
I have been using Pix4D with Lightroom for smaller jobs, like one battery. But use Drones Made Easy (DME) and Maps Made Easy (MME) for larger, 2 - 3 battery jobs.
So, Here is the integrated procedure I have pieced together to get my Inspire connected to Drones Made Easy app. I am running an iPad Air 2 with the following versions: DME app - 1.3.2, build 011416, DJI Go app - 2.4.3, Inspire - 1.6.0.40, Controller - 1.5.70 and Camera - 1.5.0.30 from the 22 December 2015 DJI downloads website.
Please feel free to comment on any steps that would improve clarity, safety or communication.
1. Power Inspire, controller and connect iPad to controller via USB cable.
2. Open the Dji Go app and verify you are connected.
3. Go to Aircraft Status and EXIT TRAVEL MODE.
4. Power off Inspire and connect camera, Power up Inspire again. I personally do not like making an electrical connection to an active computer circuit.
5. Return to DJI GO and Open Camera Menu/Settings, scroll to the bottom and FORMAT SD.
7. In SETTINGS, open camera/PHOTO and select SINGLE SHOT, IMAGE SIZE - 16:9 and finally IMAGE FORMAT - JPG and RAW. I have no idea if DME can capture or set any of these values AFTER DJI GO is closed it is closed, so set them now.
8. Next take a single photo at ground level, i.e. wherever you plan to take off. You will need a single image when you get to processing to establish ground altitude.
9. Go to DJI Library/Photos and check to confirm you have an image there.
10. For multiple battery flights the next step is important. Go to RC Settings (Controller icon next to the WiFi icon) and open AIRCRAFT BATTERY and set LOW BATTERY to 20%. I have had 30% alarm before you reach the programmed end of first battery. Right now, I do not know if DME will mark the point and return to HOME for the 2nd battery installation or ABORT the mission. Why take the chance.
11. Speaking of HOME, make sure to allow enough time for the HOME point to set in DJI BEFORE you close the app. Again, I do not know how DME sets the HOME point or transfers it from DJI.
12, Now you are ready to transfer all this info to DME. On the controller set the PAF switch (upper left) to “F”. You should see SAFE TO FLY GPS go yellow (non-GPS) and back to green.
13. Close DJI Go and make sure it is not running in the background.
14. Open MME and CREATE NEW MISSION.
15. Verify you are CONNECTED, if not close MME and reopen and make sure PAF switch (upper left) to “F”. When you get connected you can define the area with orange bounding circles for your flight. Inside the map box you should see white lines arranged in parallel paths defining the path your drone will fly. Adjust as necessary.
16. With your map box defined and your parallel flight path inside, you should now be able to open the Aircraft icon in the upper right corner and UPLOAD your flight plan.
- Press start and MME should start the engines, go to altitude and start the mission. Note all manual camera functions on the controller are disabled. You cannot take an images manually to set the ground altitude.
- Once in the air and on your first leg of the mission you should be fairly close to HOME POINT, so now is the time to check it out, particularly if you are running a 2 or 3 battery collect. The documentation is not clear here, should you use the HOME button on the controller or the MME app? I always use the controller since I know it is still connected to the aircraft. Again no clear guidance if you use the controller HOME button, is that point marked in the MME software as the returning point for the second battery? I have not tested this out yet.

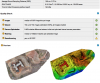
Hi there, I'm using an i1 with the X5 for mapping and 3D models. I too have had some great resultsHello all. 1st time post here.
I do a good bit of mapping with fixed wing (big sites) & DJI SDK. I tested Map Pilot with my X5 this past weekend. Results from Pix4D were excellent!
I've mapped this site 20+ times over the past year with my P3P and i1/X3 and the X5 really raised the bar. I was worried that the required AF was going to be an issue but every image was crystal clear. Good stuff!
We use essential cookies to make this site work, and optional cookies to enhance your experience.