Welcome Inspire Pilots!
Join our free DJI Inspire community today!
Sign up

Inspire 1 remote.

Joined
Oct 28, 2024
Messages
10
Reaction score
0
Age
43
I was wondering how do you know if it’s the usb board that’s bad on the remote and not the drone it’s self as well. I’ve tried multiple devices and cables including iPhone 16 , iPad mini 4. Samsung tab s . Nothing will show the a connection to the remote. But some of the devices register the remote as a power source and will start charging . Can my board still be bad ? The Go app won’t connect and my drone won’t link to the remote. I just got the drone from a family member and he hasn’t used it in a long time. I see the boards go bad a lot. But it’s charging devices so I’m not sure if it’s operational or not. I can’t find a board for sale and it looks like the best option is to buy another remote. Don’t want to unless I know for sure mine is bad. Thanks for the help.
 
I was wondering how do you know if it’s the usb board that’s bad on the remote and not the drone it’s self as well. I’ve tried multiple devices and cables including iPhone 16 , iPad mini 4. Samsung tab s . Nothing will show the a connection to the remote. But some of the devices register the remote as a power source and will start charging . Can my board still be bad ? The Go app won’t connect and my drone won’t link to the remote. I just got the drone from a family member and he hasn’t used it in a long time. I see the boards go bad a lot. But it’s charging devices so I’m not sure if it’s operational or not. I can’t find a board for sale and it looks like the best option is to buy another remote. Don’t want to unless I know for sure mine is bad. Thanks for the help.
Also has anyone had luck with iOS 15.8 and the go app for the inspire 1?
 
Which model controller are you dealing with?
I probably have whatever pieces you might be looking for.
 
I was wondering how do you know if it’s the usb board that’s bad on the remote
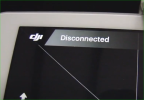
Because the remote won't connect to the tablet. If there is no connection between the tablet (app) and controller, the DJI App will say "Disconnected."
1735142580415.png


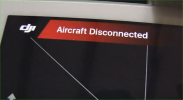
If the tablet DOES connect to the remote controller sans drone, it will say, "Aircraft Disconnected."
1735142669981.png


and not the drone it’s self as well.
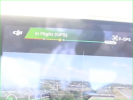
Once connected to the drone, it will say, "Aircraft Connected" in green.
1735142872728.png


I’ve tried multiple devices and cables including iPhone 16 , iPad mini 4. Samsung tab s . Nothing will show the a connection to the remote. But some of the devices register the remote as a power source and will start charging . Can my board still be bad ?
Probably not. You're dealing with legacy equipment and legacy software here, so I would try a legacy iPad. Anything with a Lightning™ interface would be a legitimate test in my book. In the Windows environment the USB-C / Thunderbolt™ interfaces require their own specific drivers. I imagine that that old Inspire 1 RC probably doesn't have them in their firmware.

I don't have my Inspire 1 with me or I would try to connect it to my newer iPads. I HAVE used the newer iPads with my P4P's, but I believe that those are a generation newer than the Inspire 1.

UPDATE: I WAS able to connect my Inspire 1 to my Gen 3 iPad using the Thunderbolt™ interface.


The Go app won’t connect and my drone won’t link to the remote.
Does it say "Disconnected" in gray or "Aircraft Disconnected" in red? The latter means that the iPad IS connected to the RC.


I just got the drone from a family member and he hasn’t used it in a long time. I see the boards go bad a lot.
They do. Ironically, I have like 5 Inspire 1 RC's and not one board has gone bad <knock on wood>...


But it’s charging devices so I’m not sure if it’s operational or not.
That would tell me that it IS operational. But truth be told, I suppose it's possible to pass current without passing data, but highly unlikely.


I can’t find a board for sale and it looks like the best option is to buy another remote. Don’t want to unless I know for sure mine is bad. Thanks for the help.
I would create a Craigslist ad requesting to borrow an Inspire 1 RC for a few minutes to test.

D
 
Last edited:
  • Like
Reactions: dmackerson
It's been my experience that the USB/HDMI boards rarely encounter a hardware (parts failure) issue. What most often happens is the firmware in the poorly-sourced NAND chips (the physical IC's on the board) that hold the processing firmware for the Intel DaVinci chip (which is responsible for processing the video feed AND linking to the USB port on the board), becomes corrupted, rendering the processing 'pipeline' for the video feed inoperative. In the many I have repaired, far less than 1% actually have a failed component (which usually has physical damage.) If you scour this site, you'll discover that repairing (software-wise) this board is, while non-trivial, certainly relatively simple. You can use the very readily available firmware for the P3P board, since it's essentially shared with the I1, and, with some very basic soldering skills and a serial-to-USB (FTDI) board, you can resurrect your board. The first time you do it, it'll take less than an hour, total. After the first time, you can do it about 10 minutes. If you're not up to that task, you can find 'pulled' working boards on EBay quite often, for around $30 or so. If you go that route, make SURE to get an Inspire 1 board, since, while the firmware IS the same (essentially) as that in the P3P, the board is different, physically. Replacing your board with a new one just requires removing the four hex-head screws holding it (and its 'case) to the back of your Tx, removing the three ribbon cables, by carefully prying up the cam bars that hold them in their connectors (two small ones, one from each side that go to the switches on the top of the radio, and the large one (from the bottom) that interfaces the board to the radio itself, being VERY CAREFUL NOT TO LET THEM FALL INTO THE RADIO, removing the 'case' (with the board inside, then finally removing the thin, plastic cover over the board, and the board itself from the 'case'. Reverse the order to get the new one in, being very careful with the delicate ribbon cables. I find it easiest to reconnect the large (bottom) ribbon first, by hold the board vertical, then, once that cable is done, place the board over its 'pins/mounts' and then reconnect (carefully) the two small, side ribbons. DO NOT overtighten the four hex-head screws, as the plastic tends to crack very easily (with age) and if all four screws 'crack through' the bottom of the case, nothing will be holding it to the radio, other than the connector to the radio!
 
It's been my experience that the USB/HDMI boards rarely encounter a hardware (parts failure) issue. What most often happens is the firmware in the poorly-sourced NAND chips (the physical IC's on the board) that hold the processing firmware for the Intel DaVinci chip (which is responsible for processing the video feed AND linking to the USB port on the board), becomes corrupted, rendering the processing 'pipeline' for the video feed inoperative. In the many I have repaired, far less than 1% actually have a failed component (which usually has physical damage.) If you scour this site, you'll discover that repairing (software-wise) this board is, while non-trivial, certainly relatively simple. You can use the very readily available firmware for the P3P board, since it's essentially shared with the I1, and, with some very basic soldering skills and a serial-to-USB (FTDI) board, you can resurrect your board. The first time you do it, it'll take less than an hour, total. After the first time, you can do it about 10 minutes. If you're not up to that task, you can find 'pulled' working boards on EBay quite often, for around $30 or so. If you go that route, make SURE to get an Inspire 1 board, since, while the firmware IS the same (essentially) as that in the P3P, the board is different, physically. Replacing your board with a new one just requires removing the four hex-head screws holding it (and its 'case) to the back of your Tx, removing the three ribbon cables, by carefully prying up the cam bars that hold them in their connectors (two small ones, one from each side that go to the switches on the top of the radio, and the large one (from the bottom) that interfaces the board to the radio itself, being VERY CAREFUL NOT TO LET THEM FALL INTO THE RADIO, removing the 'case' (with the board inside, then finally removing the thin, plastic cover over the board, and the board itself from the 'case'. Reverse the order to get the new one in, being very careful with the delicate ribbon cables. I find it easiest to reconnect the large (bottom) ribbon first, by hold the board vertical, then, once that cable is done, place the board over its 'pins/mounts' and then reconnect (carefully) the two small, side ribbons. DO NOT overtighten the four hex-head screws, as the plastic tends to crack very easily (with age) and if all four screws 'crack through' the bottom of the case, nothing will be holding it to the radio, other than the connector to the radio!
You should make a tutorial video as some of us have...<;^)

D
 
  • Like
Reactions: dmackerson
Thanks for all the info , I will be troubleshooting this week . The app does say disconnected and the charge rate isn’t even enough to charge the phone , it uses more power than it’s supplying. Thanks for all the great info , should have this bird in the air this week I hope.
 

New Posts

Members online

Forum statistics

Threads
22,406
Messages
210,228
Members
38,048
Latest member
Mihail