- Joined
- Jul 21, 2017
- Messages
- 18
- Reaction score
- 5
- Age
- 45
SOLVED - SEE NEXT POST
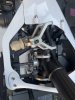
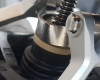
Is it possible to remove the centre spindle that is part of the centre landing gear assembly motor without removing the entire mechanism? I read on another forum post that you can just take the camera plate and the bottom off the Inspire and then the screw comes out?...
I need to get to this part in order to fix this little piece....
Many thanks for your help
Attachments
Last edited: