Correct!A link to the correct balance rod...
So balance rod goes to Hub with propeller attached correct?


You are using an out of date browser. It may not display this or other websites correctly.
You should upgrade or use an alternative browser.
You should upgrade or use an alternative browser.
How to balance the new 1345T quick release props...
- Thread starter James Cole
- Start date
I think its ridiculous to talk about having to balance the props. I use my drone to make a living and wouldn't think of it. the company knows better then me.Original DJI props are balanced and don't need any rebalancing unless scuffed or damaged in which case you should get rid of them anyway.
Balancing props is a good thing if you happen to buy non DJI props though.
Many thanks for this -- need to add a balance setup to my kit...
Much prefer this method of adjustment to the tape method.
Brian
One of the first thing I did was purchase a prop balancer with the proper balancing shaft for the 1345S, and balanced all my props, including all spares. Took a long time, but about 55% of them needed more than others. Now, my Inspire 1 fly's extremely smooth. Cheers!
I would disagree. I purchased all mine from DJI, and about 30% were about perfect, another 20% needed minor sanding, and the rest was more than the rest.Original DJI props are balanced and don't need any rebalancing unless scuffed or damaged in which case you should get rid of them anyway.
Balancing props is a good thing if you happen to buy non DJI props though.
But you are right, nothing like the non-DJI brands, which are extreme (figuratively speaking) tuning.
- Joined
- Jul 17, 2014
- Messages
- 1,442
- Reaction score
- 522
Fair enough. But did you really notice much improvement after the minor sanding?I would disagree. I purchased all mine from DJI, and about 30% were about perfect, another 20% needed minor sanding, and the rest was more than the rest.
But you are right, nothing like the non-DJI brands, which are extreme (figuratively speaking) tuning.
I have done balancing but found that for DJI originals there's little to improve. But it never hurts to do it of course!
don' t mount the hub to the i1, instead attach the hub to the prop, then you will be able to use the balancing rod.
Just to be clear, you CAN use the prop rod used on the 1345S props so long as you attach the hub to the props instead of the motors -- is that correct. If so, when the props have been balanced you then remove the hubs from the props and then attach the hubs to the motors before mounting the props -- correct?
Finally, if all that's correct then please confirm that this is the correct prop rod.
Amazon.com: EJH Precision Prop Balancer for DJI Inspire Quick Release Props: Toys & Games
Brian
Yes to everything. I have found that you can static balance the props but, can't dynamic balance because it doesn't seem possible to add or subtract weight from the center of the propellers. Hope this helpsJust to be clear, you CAN use the prop rod used on the 1345S props so long as you attach the hub to the props instead of the motors -- is that correct. If so, when the props have been balanced you then remove the hubs from the props and then attach the hubs to the motors before mounting the props -- correct?
Finally, if all that's correct then please confirm that this is the correct prop rod.
Amazon.com: EJH Precision Prop Balancer for DJI Inspire Quick Release Props: Toys & Games
Brian
JE
I have made some inserts for the props to use on my balancer rod. I would not recommend removing the hubs from the motors as these are pre torqued in the factory and thread lock applied to the bolts. My adaptors just push into the props, one for the white and one for the red as they are a different size. My balancer rod will also work with the original props and the twist on style as well as the new 1345T with the supplied adaptors.
- Joined
- Nov 22, 2015
- Messages
- 84
- Reaction score
- 14
- Age
- 46
I have made some inserts for the props to use on my balancer rod. I would not recommend removing the hubs from the motors as these are pre torqued in the factory and thread lock applied to the bolts. My adaptors just push into the props, one for the white and one for the red as they are a different size. My balancer rod will also work with the original props and the twist on style as well as the new 1345T with the supplied adaptors.
Gray do you have detailed pics of the adaptors you used?
Gray52,Not at the moment, only 3D printed them yesterday. Will try and get something up tomorrow.
Sent from my iPad using Tapatalk
I would be interested in buying a insert set off you should you run a few of these.
Thanks,
Rchjr
- Joined
- Feb 24, 2014
- Messages
- 418
- Reaction score
- 10
- Location
- Los Angeles, Ca
- Website
- www.lennyschway.com
I tried to Balance my 1345T Props using:
1345T Upgrade Kit. (CW and CCW Hubs and the Locks)
1345T Props
EJH Precision Prop Balancer Rod for the DJI 1345S QR Props
DuBro Tru Spin Prop Balancer.
(Note)
They may look to be the same sized hub but the White marked hub is slightly larger than the Red hub so don't try to use one hub to balance both props.
The 1345T Hubs (the ones that are secured to the motors) do fit perfectly onto the EJH 1345S Balance Rod Balance Rod.
The 1345T Props fit onto the Hubs. The White marked Props fit snuggly but the Red marked props fit a bit looser and easily fall of the hubs.
I had to also use the Hub Locks with the Hubs to keep the props firmly attached.
I mounted all of my 3 sets of 1345T Props on the balancer. All of the props were out of Horizontal Balance. Some much more than others. Adding a small piece of electrical tape was all that was needed to correct the Horizontal Balance.
Now here is where everything goes downhill.
The Vertical Balance is completely off on every prop I tried. (Vertical Balance comes from the Prop Hub)
Since the 1345T Prop has an outer locking shoulder on it's hub as well as the entire bottom hub and locking ring, We are now adding all of these oddly shaped parts into the equation.
Any one of these 3 hub components could be causing this Vertical Balance issue. I have never had a problem balancing T Motor Props, Phantom Props or Inspire 1 1345S Props. Those Prop Hubs
could be balanced. Once i realized that as soon as I moved the 1345T Props more than 10 degrees of their horizontal balance, they would fall heavily to one side. Holding them in the Vertical position and gently releasing them, they would fall very quickly to one side or the other. I'm not talking a gentle roll to the heavy side but a heavy roll that would cause them to do a few complete 360 degree rotations.
I don't know if the motor hubs, locking rings or the prop hubs are not balanced.
I gave up at this point and was hoping there would be more people successfully (Dynamically) balancing the 1345T Props. So far I haven't found any.
- Joined
- Feb 13, 2016
- Messages
- 96
- Reaction score
- 29
- Age
- 66
I'm new here and my name is Joe, I've been lurking and learning here for a while. I've been at this whole RC helicopter thing for over 8 years and drones for the last 4 years.
I used to film and photograph with a Raptor 90 single rotor helicopter (converted to electric) with NO GPS or self leveling gyro. I also converted it to FBL but that's it and my FPV monitor was early days composite video. Man have things come a LONG way since those days eh! :-D
OK, After much research and extensive testing, I've discovered that the hub and locking tabs are balanced with the motors (not the props).
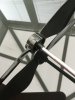
The only way I've found to truly balance the 1345T props is to do the mirror and laser pointer method. There's a Youtube link to this method lower in this post.
Procedure as I do it:
1st, You have to remove all props except for the prop that you are balancing at the moment (It's best to number or place a small color coded paint dot in the center of the props to insure the prop goes back onto the same motor each time).
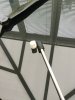
2nd, VERY IMPORTANT! Bolt a couple of metal cleats to a workbench (don't use a light piece of wood, it has be heavy enough to prevent the I1 from lifting it in the air during spool up), then use strong straps to strap the arm to the cleats that are bolted to the table. Do NOT try to have a friend hold it down, it's too dangerous! Your helper could get cut!
3rd, Drill a hole in the CD or DVD square so you can use the screw on the arm where the CF tube meets the motor/ESC housing. (as an alternative, you can use double sided sticky tape on the back of the CD or DVD to fasten it to the flat plate on the motor/ESC housing)
4th, Set up a laser pointer a few feet away that will point to the CD or DVD, the CD or DVD acts as a mirror.
5th, Start the motors and speed the motors up to take off speed.
6th, Find the reflection of the laser pointer on the wall.
If the laser dot on the wall is not moving up and down (creating a vertical line, a slight amount about the width of the dot itself is acceptable), consider that the prop is balanced in this case.
If it is moving up and down, add small amounts of black self adhesive monocote until the dot remains a dot on the wall (put the monocote strip on the leading edge of the prop with half of it under the prop and the other half on the top and make sure it's smooth with no rough edges).
Tip: place it on loosely at first, then after it's balanced, press it down firmly. (In as much as 200 flights, I've never had a piece of it come off during flight and is even difficult to remove it on purpose after it's pressed on hard. The best way to remove it s with a hair dryer to soften the adhesive, try not to get it hot enough to distort the prop though).
Note 1: The dot will be stable only at certain rpms. The trick is to get it to be as stable as possible overall. Different speeds cause the props and motor to vibrate as it reaches it's own self resonant frequency (it's the nature of physics, everything has a self resonant frequency which will vibrate at a minimum no matter what you do, you CAN"T get it PERFECT at all speeds).
Note 2: Do not use electrical tape as it WILL be slung off of the prop sooner or later!! (probably during the first spool up)
Note 3: CDs and DVDs have 2 reflective surfaces so you will see 2 reflections but they are very close together. There is a reflective plane about an 18 of an inch below the surface and another on the actual surface (the top surface is a protective surface to protect the part where the data is burned onto)
This is the way I have been balancing the props on my DJI S800 EVO and my DJI S1000 for the last 4 years, well.........I've only had the S1000 for a little over a year but this method has always worked great for me!
This method takes a while to do but it's worth it IMHO. I've had to use a strip on one side just to determine which side it needs to be on to balance it. Once you determine that, it's just a matter of how big the strip needs to be. Tip, you can use a very small piece of duct tape to determine which side you need to add weight to. Duct tape is much stickier than electrical tape but takes little effort to clean the residue off of the prop.
IMPORTANT: Do NOT use Goof Off to clean the adhesive residue off of your props, it WILL melt the prop!! I found that out the hard way :-(
Use a paper towel soaked with alcohol, don't pour alcohol on the prop itself.
Also, try to refrain from adding the strip at the end of the prop, add it to the section that is at the widest part of the prop and again, always the leading edge.
CAUTION: DO NOT put your hands too close to the prop or you will likely get hurt!!
Tip: You can use your smartphone with a vibration app that can help with visual vibrations but keep in mind that you will see what appears to be abnormally high vibrations as these apps are very sensitive.
The best place to put your phone with the app running is on the gimbal plate where the camera is mounted")
I just used this method on my Inspire Pro and it's smooth as silk now. Side note: EVERY prop was out of balance including the 4 spare props that came with it!!
Here's a link to a Youtube video of how to do this procedure>>>>>>>
I hope this helps those who are having trouble figuring out the best way to balance these odd shaped props. It seems to be the ONLY true way since there is no center hole like most old school props.
Just be careful, make sure it's secured to a heavy table or workbench, these things have more lift than ya may think. I was surprised at how much lifting power it has when compared to my S800 Evo or S1000.
Best of luck to all and please fly and film safe!!
Nice to meet you!!
Joe
I used to film and photograph with a Raptor 90 single rotor helicopter (converted to electric) with NO GPS or self leveling gyro. I also converted it to FBL but that's it and my FPV monitor was early days composite video. Man have things come a LONG way since those days eh! :-D
OK, After much research and extensive testing, I've discovered that the hub and locking tabs are balanced with the motors (not the props).
The only way I've found to truly balance the 1345T props is to do the mirror and laser pointer method. There's a Youtube link to this method lower in this post.
Procedure as I do it:
1st, You have to remove all props except for the prop that you are balancing at the moment (It's best to number or place a small color coded paint dot in the center of the props to insure the prop goes back onto the same motor each time).
2nd, VERY IMPORTANT! Bolt a couple of metal cleats to a workbench (don't use a light piece of wood, it has be heavy enough to prevent the I1 from lifting it in the air during spool up), then use strong straps to strap the arm to the cleats that are bolted to the table. Do NOT try to have a friend hold it down, it's too dangerous! Your helper could get cut!
3rd, Drill a hole in the CD or DVD square so you can use the screw on the arm where the CF tube meets the motor/ESC housing. (as an alternative, you can use double sided sticky tape on the back of the CD or DVD to fasten it to the flat plate on the motor/ESC housing)
4th, Set up a laser pointer a few feet away that will point to the CD or DVD, the CD or DVD acts as a mirror.
5th, Start the motors and speed the motors up to take off speed.
6th, Find the reflection of the laser pointer on the wall.
If the laser dot on the wall is not moving up and down (creating a vertical line, a slight amount about the width of the dot itself is acceptable), consider that the prop is balanced in this case.
If it is moving up and down, add small amounts of black self adhesive monocote until the dot remains a dot on the wall (put the monocote strip on the leading edge of the prop with half of it under the prop and the other half on the top and make sure it's smooth with no rough edges).
Tip: place it on loosely at first, then after it's balanced, press it down firmly. (In as much as 200 flights, I've never had a piece of it come off during flight and is even difficult to remove it on purpose after it's pressed on hard. The best way to remove it s with a hair dryer to soften the adhesive, try not to get it hot enough to distort the prop though).
Note 1: The dot will be stable only at certain rpms. The trick is to get it to be as stable as possible overall. Different speeds cause the props and motor to vibrate as it reaches it's own self resonant frequency (it's the nature of physics, everything has a self resonant frequency which will vibrate at a minimum no matter what you do, you CAN"T get it PERFECT at all speeds).
Note 2: Do not use electrical tape as it WILL be slung off of the prop sooner or later!! (probably during the first spool up)
Note 3: CDs and DVDs have 2 reflective surfaces so you will see 2 reflections but they are very close together. There is a reflective plane about an 18 of an inch below the surface and another on the actual surface (the top surface is a protective surface to protect the part where the data is burned onto)
This is the way I have been balancing the props on my DJI S800 EVO and my DJI S1000 for the last 4 years, well.........I've only had the S1000 for a little over a year but this method has always worked great for me!
This method takes a while to do but it's worth it IMHO. I've had to use a strip on one side just to determine which side it needs to be on to balance it. Once you determine that, it's just a matter of how big the strip needs to be. Tip, you can use a very small piece of duct tape to determine which side you need to add weight to. Duct tape is much stickier than electrical tape but takes little effort to clean the residue off of the prop.
IMPORTANT: Do NOT use Goof Off to clean the adhesive residue off of your props, it WILL melt the prop!! I found that out the hard way :-(
Use a paper towel soaked with alcohol, don't pour alcohol on the prop itself.
Also, try to refrain from adding the strip at the end of the prop, add it to the section that is at the widest part of the prop and again, always the leading edge.
CAUTION: DO NOT put your hands too close to the prop or you will likely get hurt!!
Tip: You can use your smartphone with a vibration app that can help with visual vibrations but keep in mind that you will see what appears to be abnormally high vibrations as these apps are very sensitive.
The best place to put your phone with the app running is on the gimbal plate where the camera is mounted
I just used this method on my Inspire Pro and it's smooth as silk now. Side note: EVERY prop was out of balance including the 4 spare props that came with it!!
Here's a link to a Youtube video of how to do this procedure>>>>>>>
I hope this helps those who are having trouble figuring out the best way to balance these odd shaped props. It seems to be the ONLY true way since there is no center hole like most old school props.
Just be careful, make sure it's secured to a heavy table or workbench, these things have more lift than ya may think. I was surprised at how much lifting power it has when compared to my S800 Evo or S1000.
Best of luck to all and please fly and film safe!!
Nice to meet you!!
Joe

If anyone was not aware, but I have bought from them for the other inspire props, and worked great. They have finally built a specific 1345T rod to allow us to balance again. Just in time for the season. Thanks.
Amazon.com: EJH Precision Prop Balancer DJI Inspire QR 1345T: Toys & Games
Hope this helps.
Got mine on order. Cheers!
PS. I use the Dubro balancer kit as a base, and have bought a lot of adapter rods from them, and managed to balance all my props really well.
Amazon.com: EJH Precision Prop Balancer DJI Inspire QR 1345T: Toys & Games
Hope this helps.
Got mine on order. Cheers!
PS. I use the Dubro balancer kit as a base, and have bought a lot of adapter rods from them, and managed to balance all my props really well.
- Joined
- Feb 13, 2016
- Messages
- 96
- Reaction score
- 29
- Age
- 66
If anyone was not aware, but I have bought from them for the other inspire props, and worked great. They have finally built a specific 1345T rod to allow us to balance again. Just in time for the season. Thanks.
Amazon.com: EJH Precision Prop Balancer DJI Inspire QR 1345T: Toys & Games
Hope this helps.
Got mine on order. Cheers!
PS. I use the Dubro balancer kit as a base, and have bought a lot of adapter rods from them, and managed to balance all my props really well.
Hi Hans,
I ordered one of these from Amazon too and it is made specifically for the 1345T props as advertised but you still have to use the oblong ring and locking ring from the motors to use it.
The locking tab portion of the hub is mostly part of the balance of the motor and and a small part of it is for the balance of the prop.
Without the hub mounted to the motor, there's a noticeable imbalance in the motor when spooled up.
When the hub is used with the new prop balancer, it will fall to one side or the other no matter what ya do (at least this behaviour has happened to me every time "I" tried it).
In other words, the motor, hub, prop and oblong plate (with the rectangular center tab) is all meant to work together as one unit.
I'm a machinist by trade and tried hard to use this new balancer with no usable results. :-(
If this method is what you're comfortable using, then by all means go for it. hopefully you'll have better luck with it than I did.
I forgot to mention in my post above that the aircraft should be in the atti mode rather than GPS mode when balancing the props using the laser pointer and mirror method.
I promise I'm not trying to condemn the new prop balancer, nor am I trying to discourage anyone from using this new balancer, I'm just sharing what works the best for me so please don't take my post as gospel. Again, It's just what has proven to work for me and a couple of colleagues I work with from time to time who also have the Inspire drones.
Oh, almost forgot, Notice how the balancer is tapered in the second stage? This requires that the locking ring also be attached so the prop will stay firmly in place. And.....one end is made for CW props while the other end is for CCW props. It has a groove on one end to indicate that one end is different than the other but it isn't marked for which prop you can attach to it.
You have to mark it yourself with a white or red paint dot on the very end to match the white or red dots on the props so you'll know which end is for which prop with ease, the center rectangular part and the second stage diameter are both different sizes from one end to the other. The grooved end is for the red marked props which are the CW props.
Anyone want to buy a new 1345T prop balancer for half price? ($10) Mine is for sale as I won't use it
Thank you!!

Last edited:
Thanks for the heads up, and will look how it works.
But from pictures on Amazon, you are right, the prop and lock need to be together, which makes complete sense as it rotates as a whole.
Will update when we receive it. Cheers!
But from pictures on Amazon, you are right, the prop and lock need to be together, which makes complete sense as it rotates as a whole.
Will update when we receive it. Cheers!
- Joined
- Feb 13, 2016
- Messages
- 96
- Reaction score
- 29
- Age
- 66
Thanks for the heads up, and will look how it works.
But from pictures on Amazon, you are right, the prop and lock need to be together, which makes complete sense as it rotates as a whole.
Will update when we receive it. Cheers!
You are very welcome!
I'm just trying to help by sharing my experiences with this issue and task.
Keep us posted on your results. Maybe there's a way that will work that I didn't try. It's always better when more minds are at work trying to solve issues
Have a great day and thanks again!!
Joe,
As result of your investigation and summation as presented on this prop balancer, I was curious if you had presented your findings to the seller, and if there was any response offered by EJH in that regard.
I have order this balancer for its ease of use over the laser pointer method, but now from what you've mentioned I may need to return the balancer if it doesn't work as advertised, or I too find that further disassembly of the motor hub assembly is required to perform a proper prop balancing.
Btw, wouldn't it be in your best interest to simply return the balancer under the Amazon satisfaction policy rather than selling to another for less than half the cost you had paid for balancer & shipping costs. : )
Similar threads
- Replies
- 6
- Views
- 6K
- Replies
- 10
- Views
- 11K
- Replies
- 15
- Views
- 8K
- Replies
- 8
- Views
- 4K

