- Joined
- Jul 14, 2015
- Messages
- 11
- Reaction score
- 7
- Age
- 30
Hello there, I have been thinking about adding fpv to the inspire 1 for quite a time now. What has been holding me back is how I wanted to do it. I recently decided to paint my inspire 1, and at the same time, I did the fpv mod. Heres how I did it, parts ive used and problems that came along.
1: Decide how you want to power up the fpv system. As I see it, theres 2 ways. One of them involves drawing power from the unused connector in the nose, the other one is external battery.
If you decide to go for the connector you will need this cable: IRC Tramp HV Camera Cable - 4 Pin HS1177 [TMP-CAM-HS1177] - $4.99 : Ready Made RC LLC, The Leader in All Things FPV, RC, and Beyond ($4.99). On this cable you will find the connector that is required. Be aware, I have no clue how much amps that could be drawed out of this connector. Might be enough to create a malfuction inflight, I dont know?
I personally decided to go for the external battery mod, because I did not have enough research on the connector in the nose cone. For this I wanted a battery that did not require me to bring an external lipo charger, because bringing the inspire 1 in the first hand is plenty enough. For this I chose the new google battery from fatshark: FatShark 1800mAh 7.4v Battery Pack USB Charging LED Indicator ($24.99). The reason I chose this, is because of the new usb charging method they offer. This means I can even charge on the go with an powerbank. I know its pricey, and other lipos offer the same capacity for less $. But the convinience of dont bringing a lipo charger is worth the money for me. It might be needed to buy the banana plug seperatly FatShark Banana Charge/Discharge Adapter ($4.99), so you can tap into the fatshark battery.
2: Now that you have decided for which power source you want, you need to find your fpv components. Lets start with the camera.
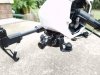
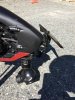
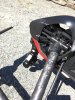
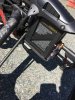
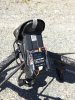
I went for runcam swift 1 RunCam Swift ($36.99), because I had that lying around from my other quad builds. I wound not recommend buying this, because the housing is too big, and you have to cut away some plastic from the IMU stand. But if you decide to go for it, you will have way better video quality, and a big variety of supported voltage. You will need to drill a 12mm hole in the nose cone for the lens to fit through. What I did was to hot glue the housing to the inside of the nose cone. That way I could adjust the focus later if needed.
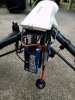
3: With the camera in place, you only really miss a video transmitter. You cant really go wrong here, as long as it supports the voltage of your battery. I ended up on this one Lumenier TX5ga Mini Adjustable 25-600mW 5.8GHz 32CH Raceband Video Transmitter ($64.99) because I had one lying around. This one allows me to adjust and verify channel/band/txpower really quick. Upgrading from the stock whip antenna is a must, and I chose this antenna Lumenier AXII 5.8GHz Antenna (RHCP) (Set of 2) ($39.99 2pack) because of its size.
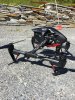
4: the remaining part now is to map out how you want it and make it a nice looking modification.
Get some wires Silicone Wire 22awg (1mtr) ($1.09) in red, black and yellow.
Get some mesh cable protector and heat shrink Mesh Cable Protector with Heat-Shrink (1m per bag) ($2.49)
Get some heat shrink for single 22awg wires to cover up the solder joints.
Hot glue pistol to glue the mesh cable protector to the inspire.
Soldering iron. Can recommend this one TS100 Digital OLED Programmable Interface Mini Soldering Iron ($59.99) if you have a charger or something that has a 2.5mm barrel connector.
Get a fpv monitor Black Pearl 32CH, HD FPV Monitor 7" Screen (FPV58100): Spektrum - The Leader in Spread Spectrum Technology ($199.99), I had this one from my phantom 2 days, and I love it because of the built in battery. But there is plenty of other fpv monitors out there, find one that suita your style. I can also hook it up to my fpv googles, but I want to be able to have the inspire 1 in sight when flying.
I hope this covers everything you may need during a fpv modification for your inspire 1. If you have any questions on how to do it, improvment that I might have missed or anything else. Let me know down below! Good luck!
1: Decide how you want to power up the fpv system. As I see it, theres 2 ways. One of them involves drawing power from the unused connector in the nose, the other one is external battery.
If you decide to go for the connector you will need this cable: IRC Tramp HV Camera Cable - 4 Pin HS1177 [TMP-CAM-HS1177] - $4.99 : Ready Made RC LLC, The Leader in All Things FPV, RC, and Beyond ($4.99). On this cable you will find the connector that is required. Be aware, I have no clue how much amps that could be drawed out of this connector. Might be enough to create a malfuction inflight, I dont know?
I personally decided to go for the external battery mod, because I did not have enough research on the connector in the nose cone. For this I wanted a battery that did not require me to bring an external lipo charger, because bringing the inspire 1 in the first hand is plenty enough. For this I chose the new google battery from fatshark: FatShark 1800mAh 7.4v Battery Pack USB Charging LED Indicator ($24.99). The reason I chose this, is because of the new usb charging method they offer. This means I can even charge on the go with an powerbank. I know its pricey, and other lipos offer the same capacity for less $. But the convinience of dont bringing a lipo charger is worth the money for me. It might be needed to buy the banana plug seperatly FatShark Banana Charge/Discharge Adapter ($4.99), so you can tap into the fatshark battery.
2: Now that you have decided for which power source you want, you need to find your fpv components. Lets start with the camera.
I went for runcam swift 1 RunCam Swift ($36.99), because I had that lying around from my other quad builds. I wound not recommend buying this, because the housing is too big, and you have to cut away some plastic from the IMU stand. But if you decide to go for it, you will have way better video quality, and a big variety of supported voltage. You will need to drill a 12mm hole in the nose cone for the lens to fit through. What I did was to hot glue the housing to the inside of the nose cone. That way I could adjust the focus later if needed.
3: With the camera in place, you only really miss a video transmitter. You cant really go wrong here, as long as it supports the voltage of your battery. I ended up on this one Lumenier TX5ga Mini Adjustable 25-600mW 5.8GHz 32CH Raceband Video Transmitter ($64.99) because I had one lying around. This one allows me to adjust and verify channel/band/txpower really quick. Upgrading from the stock whip antenna is a must, and I chose this antenna Lumenier AXII 5.8GHz Antenna (RHCP) (Set of 2) ($39.99 2pack) because of its size.
4: the remaining part now is to map out how you want it and make it a nice looking modification.
Get some wires Silicone Wire 22awg (1mtr) ($1.09) in red, black and yellow.
Get some mesh cable protector and heat shrink Mesh Cable Protector with Heat-Shrink (1m per bag) ($2.49)
Get some heat shrink for single 22awg wires to cover up the solder joints.
Hot glue pistol to glue the mesh cable protector to the inspire.
Soldering iron. Can recommend this one TS100 Digital OLED Programmable Interface Mini Soldering Iron ($59.99) if you have a charger or something that has a 2.5mm barrel connector.
Get a fpv monitor Black Pearl 32CH, HD FPV Monitor 7" Screen (FPV58100): Spektrum - The Leader in Spread Spectrum Technology ($199.99), I had this one from my phantom 2 days, and I love it because of the built in battery. But there is plenty of other fpv monitors out there, find one that suita your style. I can also hook it up to my fpv googles, but I want to be able to have the inspire 1 in sight when flying.
I hope this covers everything you may need during a fpv modification for your inspire 1. If you have any questions on how to do it, improvment that I might have missed or anything else. Let me know down below! Good luck!
Attachments
Last edited:

")