- Joined
- Jan 31, 2020
- Messages
- 52
- Reaction score
- 16
- Age
- 60
Hopefully my lessons learned can help others. Your mileage may vary with this info so use it at your own risk. I make no implied statement as to the accuracy of what I'm stating, or that it will resolve your issues. I'm only stating that helped me and it may help you too.
My saga started with my Gimbal Roll axis being tight and causing a Gimbal overloaded message to be displayed after light flying. If I hovered for a bit the message went away, the horizon stabilized and I could proceed. Knowing nothing about how these gimbals operate, I assumed I could just loosen the Gimbal nut, problem solved. Oops...
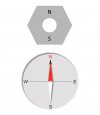
Big mistake 1, I didn't mark the nut beforehand, not realizing it was magnetized. After doing some reading here, I discovered the error of my ways. Since I already messed up, bad, I decided to remove the nut and use an old style magnetic compass to fine out what nut facet is north. using the graphic below you can see what I did. holding the nut near the compass I was able to determine which facet would cause the N on the compass needle to point towards it. By slowly spinning the nut in my had I could cause the S compass needle to point towards it. This would be the N facet on the nut. On two magnets N is attracted to S.

Fortunately there is an N stamped inside the Roll access of my Gimbal. (Not all of them have this.)
Ok, big mistake number 2. I assumed the friction of the AMP connector and ribbon cables on the Roll axis driver board was enough to make contact, it isn't. This mistake cost me several hours of wasted time with the Gimbal flying all over when It would startup. Make sure to lock the AMP connectors down on the ribbons.
NOTE: Mounting the Gimbal in the drone, and leaving only 1 screw to hold the driver board, made adjustments a lot quicker. I was able to loosen that 1 screw and swing the driver board out of the way while leaving the ribbon cables locked in place. This allowed me access to the nut to make adjustments. Just make sure between adjustments to finger tighten the single driver board screw so the board is firmly seated with respect to the housing. (If the board moves it will throw off the adjustments you are trying to make on the nut.
Once I did this, I tightened the nut with the compression washer and aligned the N facet of the nut with the N stamped on my roll axis housing. This got me in the ballpark to start. Once in the ballpark, I was able to tweak the nut +/- until I had the Gimbal startup perfectly horizontal and function normally.
Keep in mind, I only goofed up the roll axis. Had I messed with the other 2 axis I probably would be S O L and had to send my Gimbal in to DJI.
Greg
My saga started with my Gimbal Roll axis being tight and causing a Gimbal overloaded message to be displayed after light flying. If I hovered for a bit the message went away, the horizon stabilized and I could proceed. Knowing nothing about how these gimbals operate, I assumed I could just loosen the Gimbal nut, problem solved. Oops...
Big mistake 1, I didn't mark the nut beforehand, not realizing it was magnetized. After doing some reading here, I discovered the error of my ways. Since I already messed up, bad, I decided to remove the nut and use an old style magnetic compass to fine out what nut facet is north. using the graphic below you can see what I did. holding the nut near the compass I was able to determine which facet would cause the N on the compass needle to point towards it. By slowly spinning the nut in my had I could cause the S compass needle to point towards it. This would be the N facet on the nut. On two magnets N is attracted to S.

Fortunately there is an N stamped inside the Roll access of my Gimbal. (Not all of them have this.)
Ok, big mistake number 2. I assumed the friction of the AMP connector and ribbon cables on the Roll axis driver board was enough to make contact, it isn't. This mistake cost me several hours of wasted time with the Gimbal flying all over when It would startup. Make sure to lock the AMP connectors down on the ribbons.
NOTE: Mounting the Gimbal in the drone, and leaving only 1 screw to hold the driver board, made adjustments a lot quicker. I was able to loosen that 1 screw and swing the driver board out of the way while leaving the ribbon cables locked in place. This allowed me access to the nut to make adjustments. Just make sure between adjustments to finger tighten the single driver board screw so the board is firmly seated with respect to the housing. (If the board moves it will throw off the adjustments you are trying to make on the nut.
Once I did this, I tightened the nut with the compression washer and aligned the N facet of the nut with the N stamped on my roll axis housing. This got me in the ballpark to start. Once in the ballpark, I was able to tweak the nut +/- until I had the Gimbal startup perfectly horizontal and function normally.
Keep in mind, I only goofed up the roll axis. Had I messed with the other 2 axis I probably would be S O L and had to send my Gimbal in to DJI.
Greg


